Home Remedies: Tree Wounds and Healing

Written by Joshua Bush and published on https://www.hunker.com/

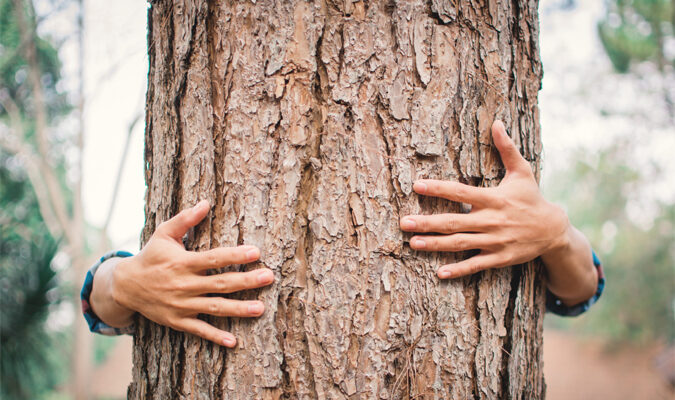
Wounds attract pests due to the phytochemicals dispersed from exposed tissue. When tree tissue is damaged or wounded, the newly uncovered tissue is exposed and that is when to expect an attack. Insect pests are drawn to trees in distress, feeding on the tissue and weakening the tree. Diseases affecting trees will introduce enzymes into the cells, digesting living tissue responsible for food and water translocation (phloem and xylem) or structural support resulting in unhealthy, unsightly, or unsafe trees.

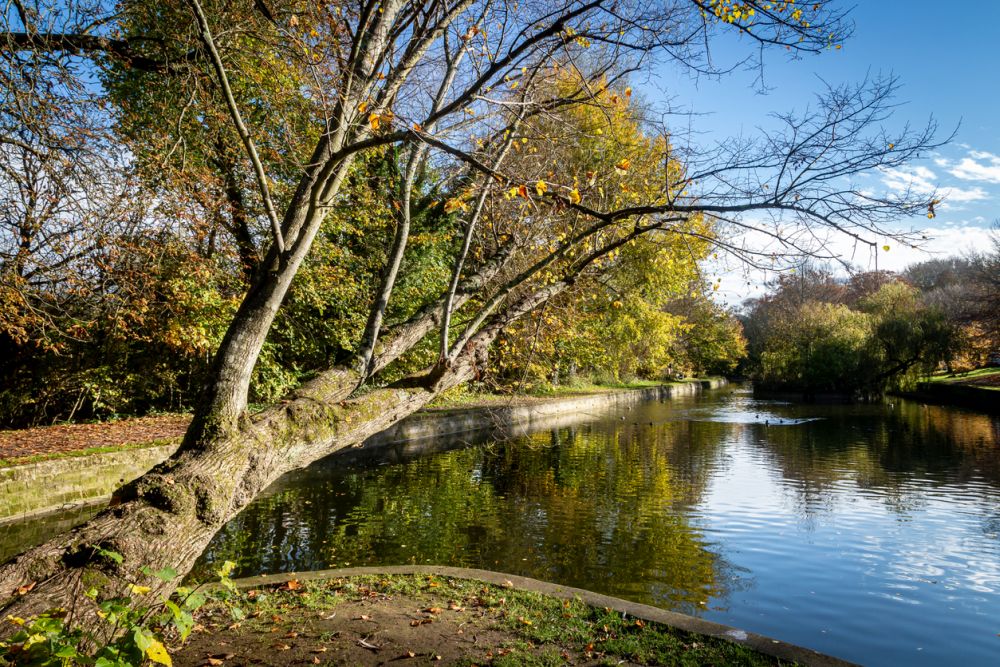
Homemade Tree Wound Remedies

...

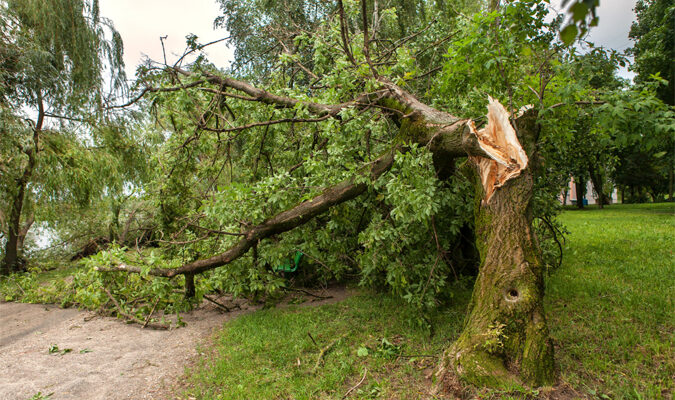
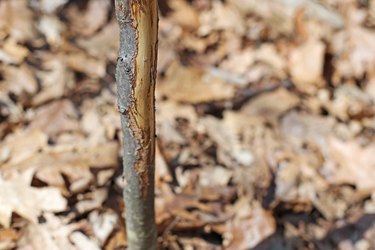
Whether broken during storm winds or cut during pruning, any break in the bark of a tree is considered to be a wound. Trees have a natural healing response that seals off and compartmentalizes the damage they receive. This natural response is impeded by homemade tree wound remedies such as petroleum and latex based paints, which are only recommended as protection in areas with a high prevalence of tree diseases. There are better methods of helping trees to recover from wounds.

Tree Wound Response

...

Trees seal off damaged areas, both inside and outside, rather than actually healing the damaged wood. On the outside, trees form callus wood that slowly grows around the edges of the wound so that new, healthy wood covers old injuries. The damaged wood is eventually covered, but remains in the tree. On the inside, the tree creates barriers to control the spread of fungi and other microorganisms. The tree’s sap and resins plug the water and nutrient transport vessels, creating both a physical and a chemical deterrent to decay.

Problem With Painted Remedies

...

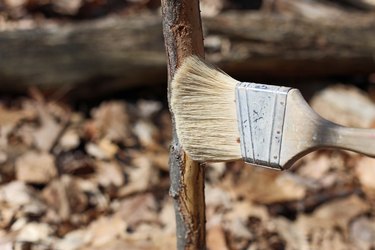
The tree’s natural remedies require the infiltration of oxygen into the wounded wood. Painted remedies that seal off an area from the environment are meant to keep out disease, insects and microorganisms. However, they also keep out the oxygen that the tree needs to complete its own healing response. As a result, wood decay is often accelerated behind the homemade or commercial painted remedies. In some areas, disease transmission and invasive insects are a prominent danger to tree health, such as areas susceptible to oak wilt and invasive beetles. In such cases, a thin layer of fungicide or insecticide can be painted over the wound.

Pruning as a Remedy

...

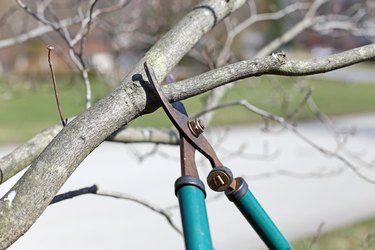
Pruning a broken branch back to a better place is usually the recommended method of helping the tree to heal its wound. A tree can more easily cover a clean pruning cut with callus tissue than a rough break from strong winds or heavy snow and ice. If you are trying to help a tree heal from broken branches, prune the branch back to the edge of the branch collar, rather than flush with the trunk for the best healing. Remove dangerous, hanging branches as soon as possible, but final pruning should done in late winter or early spring just before the sap begins to rise in the wood again and insect populations are low. Before and after pruning a tree, disinfect your tools with alcohol or other household disinfectants to prevent disease transmission, making sure to dry the tool so the disinfectant does not contact the tree.

Water and Fertilizer as a Remedy

...

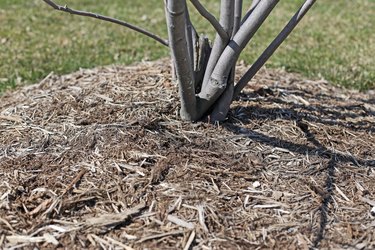
If a tree is stressed from environmental factors, its healing response will be slower than the response of a healthy tree, putting it at risk. Make sure the tree is adequately watered. Examine other branches and leaves to see if recent growth has been slow, indicating the tree needs to be fertilized. Mulching around the base of the tree, beginning a foot away from the trunk and making a bed several inches deep, will help keep nutrients and moisture near the roots where they are needed. Mulch beds also prevent root injury from landscaping equipment and animal damage.

Original post here https://ift.tt/3wHSIow.

from AAA Tree Lopping Ipswich https://ift.tt/2Sx78ZH
via IFTTT

Leaning Trees: Causes and Corrections

Written by AJ Attia and published on https://www.diys.com/

We all want our trees to grow up perfectly straight without any worrisome bends or leans, but that doesn’t always happens.  Leaning trees are not uncommon and because of that, we get a lot of questions from concerned tree-parents about crooked or angled trees.  Here’s what you need to know about leaning trees, what to look for, and how to fix them.

Some trees grow well when shaded beneath a taller tree or in the shade of a building, while others will twist and lean to get a full share of sunlight. Many shorter-growing flowering trees, for example, grow perfectly straight even when placed right next to a taller tree, but many taller trees need plenty of room and will lean if they are too crowded.

Leaning Trees – How To Straighten A Leaning Tree Of Any Size

Leaning trees are a landscape flaw as well as a health hazard. How many times have you looked at a leaning tree in your yard and felt satisfied with your handiwork? Chances are you avoid looking in the direction of the tree, let alone go near it. Whether it’s the mighty oak, the stately cassia, or the elegant Japanese maple, trees lean for various reasons.

However, there’s no need to take drastic measures such as cut down the tree and start all over again because no matter what the size or age of the leaning trees, you can still fix their awry posture. This goes for young trees as well as large ones. Cutting leaning trees should be the last option on your list. 

Leaning Trees

So what makes trees lean? And how would you go about straightening the tree without damaging the trunk, main branches, or roots? Read on to find out all about the causes of leaning trees and how to fix the bent trunks.

Causes of Leaning Trees

Despite your best efforts and no matter how much gardening experience you have, leaning trees can happen at any time. Sometimes it’s actually your fault as you might have picked the wrong spot for this type of tree. But in most cases, the reasons would have to do with the elements, the unstable soil, or unpredictable weather patterns. Here are some of the main causes of leaning trees.

  • Underdeveloped Roots: One of the main causes of leaning trees is the roots themselves. A robust root system usually keeps the tree stable in the ground. But if for some reason, the roots don’t develop fully before the tree starts growing, the top-heavy tree will keel over.
  • Wind: If you live in an area that gets steady and strong wind, then you need to protect your tree at least in the first few years of its life until it has been established in the soil. The relentless wind will make the tree lean in the other direction.
  • Unstable Soil: Unlike plants and shrubs that thrive in loose and loamy soil, trees need stable soil that offers support to their roots. If you plant the young tree in sandy soil, by the time it develops its heavy canopy, the soil will not be able to keep it standing upright. 
  • Wrong Timing: Most trees need to be planted at a specific time of the year. Usually, that would be in the early spring to take advantage of the warm soil and the favorable weather conditions. If you plant the tree in the fall instead of the early spring, the frost and freezing soil will stunt its growth. The roots won’t have enough time to develop, and the tree would start to lean under the weight of its heavy branches.
  • Moist Soil: Even if the soil is dense and heavy enough to support the mature tree, constant moisture in the soil can weaken it and put the tree in jeopardy. When planting a tree, make sure the spot you choose is away from running water and doesn’t get waterlogged often.

Straighten Young Leaning Trees

Young trees are more susceptible to leaning problems than large ones. That’s because the root system is still developing, which makes it vulnerable to anything from strong wind to wet or unstable soil. And when we say a young tree, we mean a tree that’s less than one year old. However, since the tree trunk is still thin and young, that means it’s easy to fix the leaning tree at this stage of its life. This is how you fix a young leaning tree in easy steps.

  1. You can either use a wooden or metal stake as long as it’s sturdy. 
  2. Drive the stake into the ground close to the tree using a sledgehammer. 
  3. Make sure you’re outside the area where the root system of the tree grows. 
  4. Place the stake in the same direction where the wind comes from and position it at a 45-degree angle. 
  5. Use a garden hose to get the soil around the tree base thoroughly wet.
  6. Stand in the direction where the tree is leaning and place both your hands against the trunk of the tree right above where the tree starts to lean.
  7. Press your hands against the tree, applying even and steady pressure.
  8. Once the root ball shifts and the tree trunks yield under your pressure, pack the soil with your feet to stabilize the root ball.
  9. Tie a rope around the tree and fasten it to the stake. Make sure it’s secure, but it should allow the tree to sway a little.
  10. It will take up to a year for the tree roots to develop and the tree to anchor itself. Then you can remove the rope and the stake.

How to Straighten Large Leaning Trees

Leaning Trees

Unlike young trees, large and established trees are not that easy to fix. They won’t yield easily to pressure due to the thickness of the trunk and the robust root ball of a tree this size. As you might expect, stakes alone will not work well with large leaning trees. Instead, you will be digging a trench to help straighten the tree. Here’s how to do it in simple steps.

  1. Measure the thickest part of the trunk using a measuring tape. This will give you an idea of how large the ditch will be.
  2. Use a shovel to dig a trench two feet deep around the base of the tree. The idea is to free the roots to make it easier to straighten the tree trunk. 
  3. The width of the trench should be relative to the size of the trunk. For every one inch of the tree trunk, dig 10 inches in the ground.
  4. When done digging the trench, wrap a thick pad or a few old blankets around the tree trunk to protect the bark.
  5. Wrap a sturdy and thick rope around the tree trunk and tie it securely.
  6. Tie the other end of the rope to a tractor or a car. If you have enough manpower, then you won’t need the vehicle.
  7. Pull at the rope slowly but steadily until the tree responds to you. 
  8. Don’t try to pull the tree straight up in one go. This could damage the roots beyond repair. Instead, pull it up in small increments.
  9. When the tree is fully upright, refill the trench and pack the soil around the base. 
  10. You might need to keep the tree tethered to the ground for a few months until the root ball anchors in the soil.

Tips for Fixing Leaning Trees

Although the above steps to fixing leaning trees seem simple enough, they are anything but. Unforeseen circumstances could arise and complicate the process of straightening the tree up. The following tips will come in handy, and they are relevant to all tree ages and sizes.

  • Always go easy on the tree trunk when bending it up. The tree has been in this position for months, so yanking it back upwards could damage the trunk and the root system. Medium-size and large trees could take months to become fully upright.
  • Give the straightened tree enough space to grow. You might have to prune any trees around it to improve air movement and sun exposure.
  • When the straightened tree is well anchored in the ground, you can remove the ropes and stakes.
  • The ties you put around the tree trunks are not permanent. Even if you put them there for only a year, the tree will grow during that period. So you need to adjust the knot and allow the tree room to grow and sway.
  • Always use a pad around the trunk before you tie the rope. This will protect the bark.
  • Established trees need extra care when handling their roots. Make sure the roots are loosened in advance, or you might damage them.
  • After straightening the large tree, fill back the trench and pack the soil firmly. You can mix the soil with fertilizer and water the tree to help the soil settle.

How to Prevent Leaning Trees Problem 

Leaning Trees

As you can see, it takes a lot of time and effort to get the leaning trees straightened up and pointing to the sky again. So what can you do to prevent this problem from ever happening to your trees? Here are a few considerations for you when choosing a new tree to plant in your yard or your garden.

  • As every arborist will tell you, you should only plant trees that are suited to your region or zone. Adverse weather conditions can have a negative impact on the tree’s growth.
  • Always plant the new tree in the right season. When in doubt, you can consult with the nursery where you bought the tree.
  • When selecting a spot for the young tree, make sure there’s enough space for the mature tree. It shouldn’t be too close to a wall or a fence that could push the trunk the other way and cause it to lean.
  • Trees with invasive roots shouldn’t be planted near underground pipes, sidewalks, or driveways. The roots could get entangled with the structures near them, which affects the stability of the tree.
  • Look for the right fertilizer for your specific tree species. Both organic and chemical fertilizers can boost the growth of the tree and help it establish faster.
  • Water is important for the tree, especially in the first few years of its life. You should have a steady source of water conveniently close to the tree. Without adequate water, the root system of the tree will take longer to develop, which increases the risk of the tree leaning to one side.
  • Select a spot that gets enough sunlight. Most trees need the full sun to grow and thrive. Partial or full shade could weaken the tree’s structure.

Original post here https://ift.tt/3fB9GPL

from AAA Tree Lopping Ipswich https://ift.tt/2TmJJKR
via IFTTT

Signs That You Need To Hire A Tree Removal Company

Written by Admin and published on https://www.homoq.com/

Whether you are worried about that big tree that is leaning in your front yard, or you just want to get rid of that old stump, you will need to call in the professionals. Hiring a tree service company is not as straightforward as it may seem, and requires a little foresight and planning. Our guide is here to help take a little bit of that burden off your shoulders, featuring tips on how to search for the right tree company and the questions you should ask when you find one.

When it comes to tree care, some jobs are too big and too dangerous, or just need professional expertise to keep the tree healthy.

When to Hire a Tree Removal Company

When to Hire a Tree Removal Company

Did you know that trees can make you feel happier? It’s true. Studies have shown that they can reduce stress and improve mood.

That’s not all; they also clean the air, provide oxygen, prevent soil erosion, and more. Like all living things, however, they can succumb to disease.

For example, fungi can affect the roots, and depending on the severity, it can lead to tree death. In cases like that, you’ll want to get it removed.

Thinking of removing a tree from your yard? Not sure whether or not you should hire a tree removal company?

If so, you’re on the right page. We’ll be going over a few common scenarios where tree removal will be necessary below. Keep reading to learn more!

The Tree Is Dying or Dead

Dead trees usually create problems. Not only do they have a tendency of dropping branches, but they can also fall over, causing property damage.

On top of that, they can attract a variety of pests and vermin. Given that, it’s best to remove them completely. Depending on the situation, you might also want to hire stump grinding services.

The Tree Is Diseased

Not all tree diseases can be treated, especially if they’re caught in the late stages. If that’s the case, it’s better to remove it altogether.

That way, you won’t have to worry about the disease spreading to healthy trees in the area. It’ll also prevent it from becoming an eyesore.

It’s In a Bad Location

Trees in a bad location may have to be removed. For example, those planted too close to a home can cause property damage as they grow.

Similarly, some trees can get in the way of power lines. Not only can it start a fire, but it can also come into contact with the wires, creating a safety hazard for anyone who’s near the tree.

The Tree Is Messy

Some trees can be messy. For example, they can shed needles, seeds, or fruit, all of which can affect your curb appeal. For those who don’t want to deal with the cleanup, you can always remove them.

How Much Do Tree Removal Services Cost?

The price for tree removal depends on various factors such as the height and diameter of the tree. The location of it matters as well. For example, those close to power lines will be more expensive to remove.

On average, however, you can expect to pay between $200 to $1000.

Make sure to ask if any additional services are included in the price such as trimming, pruning, or stump removal.

Hiring a Tree Removal Company

There are several situations that call for tree removal. The last thing that you want is for it to become a safety hazard—that will only endanger you and your family.

Original post here https://ift.tt/2Tgo2Mr.

from AAA Tree Lopping Ipswich https://ift.tt/2RX70CJ
via IFTTT

Mushrooms On A Tree Trunk Means Your Tree Is Dying

Written by Robert Korpella and published on https://homeguides.sfgate.com/

Mushrooms are a common sight in fertile garden soil, healthy landscapes, on outdoor woodpiles, and fallen trees. This may contribute to the misplaced sense of normalcy when you see them growing on tree trunks or root flares.

When you have mushrooms growing in your yard or at the base of your tree it can be worrisome. Mushrooms can be a sign of root rot, heart rot, and overall decay. When these conditions are left untreated it can cause your tree to uproot or snap and come crashing down on your property.

Although not all mushrooms are bad, it’s important to be able to recognize mushrooms that are signs of decay.

Mushrooms & Dying Trees

Mushrooms on a tree are an indication the tree is suffering damage. The tree may be dying, or at least facing serious health issues. Mushrooms are the fruiting body of a fungus, and they often sprout after the fungus has already established itself inside the tree. By the time mushrooms form, the internal structure of the tree is usually already compromised.

Fungal Attacks

Some types of fungi attack tree roots directly, while others enter the tree through a wound. Cuts and scrapes in bark or roots open a tree to fungal attacks. These wounds may have come from a nick by a lawn mower blade, excavations, pruning, or from wind and ice damage. Once the fungus finds a way into the tree’s interior tissue, it produces an enzyme that breaks down wood fibers, releasing nutrients needed to feed the fungus. After mushrooms become visible, the attack is well underway, and the fungus has begun reproducing through spores in or on the mushroom.

Symptoms

Some symptoms of a fungal attack may be easy to miss if you don’t see mushrooms. Dying leaves and limbs, bark discoloration, early fall colors and lesions may resemble symptoms of other diseases. Mushrooms may only last a few days or weeks, depending on the species, so they will not always be present. Mushrooms may appear along the roots, trunk, one or more limbs, or at pruned sites on the tree. If you see mushrooms, it’s an indication of extensive interior damage to roots, branches or the trunk.

Damage

As the fungus eats away at the tree’s tissues, it destroys the entire structure. Root damage could result in trees that topple in a high wind. Branch and trunk damage results in weakened limbs that break off, their falling putting people and property in danger. Some of these issues may arise before mushrooms appear, and they are likely to occur after mushrooms arrive.

What to Do

Once a tree is infected by a fungus and mushrooms appear, there is little, if anything, you can do to save the tree. You may wish to call a certified arborist, a professional trained in diagnosing and recommending treatment for various tree diseases. Occasionally, if the infected limb is removed, you can save the tree, but the more likely scenario is that the tree must be completely removed. The fungus and spores may also live in the soil, proving fatal to other trees or shrubs planted in the same spot. An arborist may suggest methods to expedite the process of removing fungi from soil.

Original post here https://ift.tt/3wLNKHj

from AAA Tree Lopping Ipswich https://ift.tt/2SAOZKG
via IFTTT

GREEN IS GOOD: A GUIDE TO BASIC CARE AND DURABLE TREES

Written by Jasper Boekelman and published on https://www.homoq.com/

Trees are a great investment, but there are a wide range of issues involved in selection and care. The resources you will find here provide you with information on choosing the right tree for your landscape, as well as how to care for your trees.

Trees can take up to three years to become fully established. These first three years are the most critical and when we can influence their overall health the most. We have another This guide will cover what happens after planting and the best practices for the first few years.

Green Homes Make Green Planets: A Guide to Tree Care

Green Homes Make Green Planets: A Guide to Tree Care

Did you know that there are more than 60,000 different types of trees in the world? So no matter where you live, it’s possible to grow trees in your yard.

But many people aren’t exactly sure how to take care of their trees. And with so many varieties, it can be tough to know exactly what to do.

That’s why we’ve put together this guide outlining some of the most important parts of tree care. Keep reading to learn more.

Know The Needs of Your Trees

First and foremost, it’s time to do some research. Before taking any action with the trees in your yard, you should spend some time learning about them.

There are a few key points of information you’ll want to know for each tree. First, what type of soil is best for it? And how often and how much should you water it?

Also, look to see if your trees have any sensitivities to certain environmental factors.

It used to be that you’d need to find this information in books. But in today’s digital world, a simple Google search can help you find what you’re looking for.

Water Effectively

Now for one of the most important parts of tree care: watering.

It’s no secret that water is one of the most important parts of taking care of any plant, and trees are no different. However, the specifics of watering will change depending on the tree you’re caring for.

In the heat of summer, your tree needs to be irrigated regularly. This is also true during any other drought season you have throughout the year. If you don’t water them in these dry periods, they will die.

Usually the best method for watering trees is infrequent deep watering. Instead of light watering every day, trees prefer a lot of water every once in a while.

Also, note that new trees are going to need more water than older trees. Mature trees are generally quite hearty and can withstand tougher conditions than younger ones.

It’s Pruning Time

Next, let’s cover another key part of tree care: pruning.

Every year in late winter or early spring, you should dedicate time to prune your trees before they begin growing new branches.

This process gets rid of excess growth and allows your tree to focus all its nutrients on growing high-quality new branches. It’s often a little overwhelming to prune a whole tree if you’ve never done it before.

But if you have a little experience or are feeling brave, here are some pruning tips to follow.

First, look for dead and broken branches. These are an invitation for moisture and organisms that can begin to rot your tree.

Also, look for any branches that cross. When this happens, it’s normal for a wound to form in the place where the branches rub against one another. To avoid this, get rid of the smaller branch.

Another common pruning strategy is to cut off low branches. This will allow more light to get to the space below your tree and can help your tree grow taller season after season.

Protect the Roots

If there’s something wrong with the roots of a tree, the whole tree will be affected. To ensure healthy roots, start by working on the soil.

It’s essential that your soil has proper levels of oxygen. This allows the roots to effectively absorb nutrients.

If your soil is too densely compacted, there won’t be enough space for air. And without air space, say goodbye to healthy oxygen levels.

When working on your root soil, focus on the critical root zone (CRZ). This is the area right around the tree where the core of the roots are. You should be very careful not to disturb the CRZ in terms of compacting or changing the grade of the soil there.

Recognize Tree Diseases

Last but not least, in order to properly care for your trees, you should be able to recognize common tree diseases.

The truth is that besides watering, you probably won’t have to actively care for many of your trees. But you should keep an eye out for diseases.

Look for any abnormal changes. This could be stunted growth or a fast change in color.

One of the best ways to keep an eye out for tree diseases is to regularly assess your trees. Simply keep an eye on them so you know what they look like, how they feel, and how they are growing.

This way, you’ll be able to notice changes soon after they happen. And just like in people, the best way to mitigate damage from a tree disease is to catch it early.

There are also lots of online tools available that can help you recognize the common signs of disease for your specific tree species.

The Tree Care Tips You Need

There you have it—our top tree care tips to make sure your trees are healthy and strong. Now that you’ve read through these ideas, it’s time to put them into place.

Start by researching the types of trees you have on your property so you can properly take care of them. And then get started watering, pruning, and caring. Soon you’ll enjoy a healthy, vibrant yard with beautiful trees.

Original post here https://ift.tt/3fOav6l.

from AAA Tree Lopping Ipswich https://ift.tt/3hZFE9R
via IFTTT

Why We Need To Plant A Tree In Our Back Yard?

Written by Savannah Sher and published on https://www.bobvila.com/.

Though trees certainly add natural beauty to any outdoor space, there are a variety of practical advantages to having an appealing wooded property. Planting trees in your yard is a long-term investment that can improve your local ecosystem and your community’s air quality, and help regulate global pollution levels. Read on to learn more about the positive effects that trees have on your health, budget, and property value.

5 Clever Reasons to Plant a Tree on Your Property

Though Earth Day and Arbor Day are good reminders about how important trees are to the environment, any day is a good day to plant a sapling on your property. Trees can help improve your health, increase property value, lower energy costs, and more.

Though trees certainly add natural beauty to any outdoor space, there are a variety of practical advantages to having an appealing wooded property. Planting trees in your yard is a long-term investment that can improve your local ecosystem and your community’s air quality, and help regulate global pollution levels. Read on to learn more about the positive effects that trees have on your health, budget, and property value.

Increased Property Value

Landscaping undoubtedly increases a home’s curb appeal, but it turns out that trees can also significantly affect a home’s value. According to the United States Department of Agriculture (USDA), healthy, mature trees add 10 percent to your property’s value.

Energy Savings

Planting trees can result in major utility savings in the long run. According to the Arbor Day Foundation, mature trees’ cooling effect can reduce air conditioning consumption by 30 percent. Depending on your climate, trees can be used to maximize shade, deflect cold winds, channel breezes, or magnify the sun’s warming effects. The United States Department of Energy estimates that three strategically placed trees can save a household between $100 and $250 per year in energy costs.

Improved Air Quality

Trees reduce pollution and even remove fossil fuel emissions from the atmosphere. In fact, trees reduced 17.4 million tonnes (about 19.2 million U.S. tons) of air pollution in the United States in 2010. While fossil fuel emissions reduction is important on national and global scales, it can also directly impact your home’s air quality. A 2013 study from the University of Lancaster in the United Kingdom showed that roadside trees reduced air pollution in nearby buildings by more than 50 percent.

Better Mental Health

Not only do trees positively affect our physical health, they can also improve our mental health. A large-scale Australian study found that residents of areas with at least a 30 percent tree canopy had a 31 percent lower risk of psychological distress than those living in areas with fewer trees. A study from Chungbuk National University in South Korea revealed that office workers who could see trees from their windows reported lower stress levels and higher job satisfaction levels.

Sustained Wildlife

Trees act as habitats for birds, squirrels, and other wildlife, simultaneously providing both food and shelter. Plant evergreen trees to create a year-round habitat for your local wildlife. Many trees attract pollinators, like bees, which in turn helps global ecosystems. Plant maples, fruit trees, linden, and hawthorn trees to help sustain the global bee population.

Original post here https://ift.tt/3unhokQ.

from AAA Tree Lopping Ipswich https://ift.tt/3urIM0O
via IFTTT

Possibilities Of Why Tree Leaves Are Turning Yellow

Written by Sarah John and published on https://www.hunker.com/

Yellowing leaves can be caused by a number of factors, and typically signal that your plant is in some kind of distress. Unfortunately, there are dozens of potential causes of this one problematic symptom, and narrowing it down can be challenging. 

When a tree’s leaves turn yellow or drop off in summer, it could be due to a number of causes. Sometimes, it’s perfectly normal and nothing to worry about. But, in many cases, summer leaf yellowing is caused by insects or diseases, environmental factors, or things you’ve done (or not done!) to your tree, all of which can result in dieback and failure to thrive.

My Tree Leaves Are Turning Yellow

...

Yellowing of tree leaves may occur for several reasons.

When a tree’s leaves turn yellow, it’s often an early indication of a pest problem or disease associated with fungi or bacteria. However, it may also be the result of a vitamin or mineral deficiency. Address color changes as soon as possible. Treating for pests or providing additional nutrients may be the answer in restoring the tree’s health.

Chlorosis

Chlorosis is an abiotic illness commonly found in several areas of the United States. Unlike other problems, it is not caused by a disease or pest. The yellow leaves are the result of low chlorophyll production. Chlorophyll is what gives the green color to leaves and allows the use of sunlight for food and energy production. The most common cause for this is iron deficiency, usually treated by adding iron supplements to the soil. This problem may also be caused by overwatering, root damage or damage caused at the trunk. Early on, leaves will turn a yellow-green color, and become more yellow as the illness progresses. If left untreated, veins and leaf edges may turn brown and die. Once this stage occurs, tree growth usually stops and branches begin to die.

Mineral Deficiency

Most types of trees require at least 16 elements to function properly. Among these are iron, nitrogen and magnesium, and to a lesser extent manganese and boron. If these elements are not available in large-enough quantities naturally, add them for the well-being of the tree. If left unchecked, the leaves become brittle and turn yellow, the fruit dies, along with the branches. Slight differences are noticeable in the yellowing pattern and change depending on which element is lacking. Nitrogen-poor leaves develop a mottled pattern, versus yellowing bases of leaves with a magnesium deficiency. Each of these problems is easily treated by adding supplements to the soil.

Aphids

Aphids are common garden pests and may affect just about every tree species and region in the country. These insects tend to do the most damage to young, newly planted trees; handle these pests quickly. One of the earliest signs of an aphid problem is a yellowing and curling of leaves. Once this occurs, a good dose of pesticides can get rid of the bugs. Since they tend to be persistent, more than one round may be necessary. Some growers plan ahead by introducing lady bugs to their new trees. These insects are beneficial to the tree since they are natural predators of aphids.

Citrus Greening

Usually carried by the Asian citrus psyllid, citrus greening is a contagious disease that most often severely damages young citrus trees. This pest is a big problem across most of the southern United States, including parts of Texas, California and Florida, where a large number of citrus is grown. In the early stages of infection, leaves yellow and dry out. These effects move toward the major parts of the tree, including fruit and branches. Fruit becomes misshapen and bitter, and production stunted. If left untreated, the core of the tree will curve, with irreparable effects.

Original post here https://ift.tt/3yHKyy7.

from AAA Tree Lopping Ipswich https://ift.tt/2SrVpvr
via IFTTT

Pro Tips On How To Make Trees Boost Grow

Written by Hunker Team and published on https://www.hunker.com/

Any tree can be a fast growing tree. All you have to do is follow some important steps from the very beginning and you can make any type of tree grow at an incredible rate.

Everyone wants to know what can make trees grow faster so their landscape can be the influence of the neighborhood. While an instant growth serum hasn’t been made yet, we can take a look at things you can do at home to help those trees grow at their maximum yearly capacity. As a bonus, we’ll also look at a couple of trees that are known for growing fast in general.

How to Make Trees Grow Faster

Make Trees Grow Faster

Moving into a new home and beginning to landscape your yard can be a very exciting time. Many people purchase small trees at very cheap prices in hopes of someday having a large shade tree or foliage to block unsightly views. Trees generally take a long time to grow large enough to accomplish this however. So how do you get your newly purchased tree to grow large quickly? Follow the below steps and you will see noticeable growth each year as a faster than typical growth rate.

Step 1

In order to jump start the growth of your tree, you will need to focus on root feeding. Spraying water from a hose on top of the tree root ball or wood chips covering the root ball is very inefficient and wasteful of water. The reason for this is that not much of the water penetrates the soil deep enough to thoroughly soak and feed the roots. Instead, you should attempt to direct the water directly to the roots.

Step 2

There are a few different methods you can utilize to target your watering directly onto the roots. The first method is to cut a 1 inch PVC pipe roughly 2 – 3 feet long. Then pound the PVC pipe into the ground directly under the foliage (not too close to the tree trunk). Leave about 1 – 2 inches of PVC pipe exposed above ground. When you water the tree, fill the PVC pipe with water, and the water will go directly to the roots of the tree.

Step 3

Another method is to use a drip line around the tree. This produces a slow trickling of water that will penetrate the soil better than sprayers or directly from the hose. By reducing the water flow, the soil has enough time to absorb the drip water in turn directing the water right to the roots. This also eliminate unnecessary runoff from hose spraying trees. The trick to drip feeding is that you have to leave the drip feeders on for a long period of time per watering. Generally 30 minutes or longer is best for trees in order to water the roots enough.

Step 4

The third method to directing water down to the roots is through a root irrigation stake. These stakes attach directly to your hose, and you stick them deep into the soil. Turn on the water, and the water sprays out the end of the stake underneath the ground.

Step 5

Lastly, you will want to select a high potent fertilizer such as Miracle-Gro, or if you prefer organic fertilizers, try various types of Seaweed extract. Direct all fertilization either through the PVC pipe, through the drip irrigation system, or into the irrigation stake. This will ensure the fertilizer goes directly to the roots. By doing this, you avoid fertilizing the soil between the ground and roots, and instead focus directly on the roots. Fertilize your tree roots every 1 – 2 months, and you will see larger leaves and a much quicker than typical growth rate.

Original post here https://ift.tt/3ultA5e.

from AAA Tree Lopping Ipswich https://ift.tt/3vr23kk
via IFTTT

Preparations, Removal, and Planting For Relocating A Tree

Written by Amelia Allonsy and published on https://homeguides.sfgate.com/

You might have already chosen one of the best trees for small gardens and planted it in a position you think is perfect, but then realize a year or two down the line that it has outgrown its spot or simply never looked right there in the first place.  Luckily trees can easily be relocated if you do it at the right time of year. Young trees relocate better than more established ones though, which are trickier to move, especially if they’ve been in the spot for more than five years. 

How to Relocate a Tree

A soil ball intact around tree roots reduces transplant shock so trees recover quickly.

Trees grow poorly when located too close to buildings or in areas that don’t provide the sunlight and soil requirements for the type of tree. You can relocate a tree to a more suitable environment, but you must take special care to reduce the amount of shock to the tree so the tree can recover easily from relocation. For well-established trees planted in the same spot for over three years, this requires a three-year root pruning process. Younger trees don’t require a long recovery time before transplanting. Contact a tree removal service for moving large trees.

Preparation

  1. Measure the tree trunk diameter and multiply this figure by nine to determine the distance away from the trunk to prune the roots. For example, a 2-inch diameter tree trunk requires a circle 18 inches away from the trunk or 36 inches in diameter. You can lay a garden hose on the ground to form the circle, then transfer the circle to the ground with landscaping spray paint.
  2. Cut one-fourth of the circle on two opposite sides of the tree with a spade, cutting 12 to 18 inches deep to sever the long roots. Make these cuts during the dormant period two years before moving the tree. For younger trees, you can cut the entire circumference of the circle at once only a few months before you move the tree. Severing the long roots promotes the growth of smaller roots that hold the soil ball intact.
  3. Cut the remaining two quarters of the circle around the tree during the dormant period in the second year. Allow another full year for the tree to recover and develop new shorter roots before actually moving the tree. Disregard this step for young trees because the young trees don’t require a two-stage cutting and recovery process.
  4. Water the tree deeply the day before you move the tree.
  5. Cut a circle around the tree about 6 inches out from the root pruning circle and to a depth of about 18 inches on the day you transplant the tree. Although you have already cut around the tree to prune the roots several months or a year before relocating, you must cut around the tree to sever any new, long roots and free the tree from the soil.
  6. Push the spade or a shovel under the tree’s soil ball and gently rock the tree to break the bottom roots away from the soil. Reposition your shovel on the opposite side of the tree and repeat, then continue around the tree until the soil ball seems loose.
  7. Cut any roots on the bottom of the soil ball with a pair of bypass pruners or lopping shears, if applicable. This step might not be required if the roots break away naturally when you insert the shovel or spade under the soil ball.

Removal and Planting

  1. Dig a hole two to three times the diameter and just as deep as the soil ball. Choose a location that provides the sunlight and soil needs for the tree species and that is located at least 20 feet away from your house or other buildings. Trees that grow very large require additional distance away from buildings. If the tree requires fertile soil with good drainage, you can incorporate organic matter, such as compost and leaf mold, to improve the soil.
  2. Lift one side of the soil ball with the spade or shovel and slide a piece of burlap under the soil ball. You might have to lift the soil ball on several sides to work the burlap under the entire soil ball. If desired, tie the branches up with twine to make the tree easier to handle.
  3. Lift the tree out of the hole and into a wheelbarrow or garden cart, if desired. Do not lift the tree by the trunk. Instead, use the burlap to help lift the tree and keep the soil ball intact around the roots. This task might require several people, depending on the size of the tree.
  4. Gather up the burlap ends around the soil ball and secure by tying soft twine around the trunk.
  5. . Move the tree to the new planting location. A wheelbarrow or garden cart makes this task much easier, or you can enlist help and carry it to the new location.
  6. Set the tree gently in the planting hole and untie the burlap. You can remove the entire piece of burlap carefully without disturbing the soil ball or unwrap the burlap from around the top of the soil ball and leave the burlap in the hole to decompose on its own.
  7. Fill in the hole with a mixture of garden soil amended with finished compost, sphagnum peat and coarse sand to improve soil fertility and drainage. You must plant the tree to the original planting depth for the best success.
  8. Water and fertilize the tree at the same time, using a water-soluble fertilizer added to the water supply. Add more soil as needed if the soil settles when you water the tree.

Original post here https://ift.tt/3bXOWPG.

from AAA Tree Lopping Ipswich https://ift.tt/3fqA8LN
via IFTTT

Do’s And Dont’s: Transplanting A Tree

Written by Jennifer Noonan, Bob Vila and published on https://www.bobvila.com/

You’ve invested time and money in your landscape but landscapes evolve and mature over the years. At some point, you may need to make changes. These changes could include moving established trees.

Transplanting a small tree (sapling) is a little more involved than simply buying a container-grown tree and setting it out—a few extra considerations come into play. Nevertheless, the basic principles of preparation and care are the same. With a bit of effort and determination, your young tree will be healthy and growing in no time.

HOW TO TRANSPLANT A TREE: WHAT TO DO AND WHAT NOT TO DO

Trees root into the earth, but that doesn’t mean they are impossible to remove from the ground and transport to a new home.

You love your trees, but sometimes they’re better suited for locations elsewhere. Perhaps they’ve outgrown the space in which they’re rooted, or, maybe you plan to move somewhere new but wish to bring that special tree along with you.

GUIDELINES FOR SAFE & PROPER TRANSPLANTING OF TREES

Regardless of the tree you’re moving and space to which you plant transport it, there are several guidelines to follow for the safe and proper transplanting of trees:

WHEN IS THE BEST TIME OF YEAR TO TRANSPLANT A TREE?

There are good and not-so-ideal times of the year to transplant trees. “The best time to transplant a tree is when it’s dormant and the ground conditions are ‘just right,’” says Rick Hanshaw, manager of the Davey Nursery in Wooster, Ohio.  Find the best months of year to transplant your tree, including your pine, oak, maple or fruit tree. 

WHAT SHOULD I CONSIDER WHEN PICKING A NEW HOME FOR A TREE?

Ideal transplanting locations depend on the size and species of the tree you transplant. According to Hanshaw, trees prefer different levels of shade and sun, as well as varying soil drainage conditions. The potential height and size of the tree and the location of home foundations, power lines and underground utilities all affect the transplanting location. “You need to identify the tree species first,” Hanshaw says. “There are a lot of different variables involved with choosing the correct location to which to transplant a tree.”

TRANSPLANTING MATURE TREES VS. YOUNG TREES

There isn’t a big difference between transplanting mature trees vs. young trees. The vigorous growth rate and easily manageable root ball of a young tree make its transplanting process fairly easy. However, all trees experience some degree of shock after being transplanted—the length of recovery time simply depends on the quality of aftercare. “Mature trees will just take more aftercare than younger trees after being transplanted,” Hanshaw says.

CAN ALL TREES BE TRANSPLANTED?

Some tree species react better to transplanting than others. According to Hanshaw, red maples, elms, and bald cypress generally respond better to being transplanted than other species, in northern regions, in particular. “Specifically red maples have much more fibrous root systems of which you can capture more when digging,” Hanshaw explains.

Most trees will move well, assuming proper time is allotted to correctly fertilize, root prune, dig the properly sized root ball and water before and after transplanting. It is equally important to continue a pest management/fertilization program after transplanting, as the tree can have a 1- to 2-year root transition growth before becoming reestablished.

The only conditions for which we do not recommend relocating a tree include:

  • The tree is in a state of stress/deterioration that would warrant a removal
  • The new location is unsuitable for the specified tree.

SET YOURSELF UP FOR SUCCESSFUL REPLANTING

  • Ensure the time and budget required to transplant a tree in a careful, timely manner is available.
  • Your tree will lose a significant amount of its root system during transplanting. Make sure it’s well-hydrated before the transplanting process begins.
  • Once the tree is uprooted, tie up the crown as much as possible to reduce limb breakage during the move.
  • Wrap the tree in a tarp to reduce wind damage and moisture loss.
  • Water the tree as soon as possible after transplanting. This is the most important.
  • Follow up with proper tree care and inspections for insect damage.

Original post here https://ift.tt/3up9BTm.

from AAA Tree Lopping Ipswich https://ift.tt/3hTtG1r
via IFTTT